You’ve spent an entire golden hour chasing the perfect sunset shot — the light is fading, the composition is flawless, and you press the shutter with confidence. But when you review the image later on your screen, a hazy blur smears across the frame, turning what should have been a portfolio-worthy capture into a frustrating disappointment. The culprit? A tiny fingerprint smudge on your lens that you never noticed in the field. It’s a scenario nearly every photography hobbyist has faced, and it stings every time.
What makes matters worse is that many photographers attempt to fix the problem with whatever’s handy — a shirt sleeve, a tissue, or even their breath and a rough wipe. These shortcuts don’t just fail to clean properly; they can scratch delicate lens coatings and cause permanent damage that no amount of post-processing can undo. The good news is that achieving spotless clarity doesn’t require expensive professional services or complicated techniques. This guide walks you through everything you need to know about removing lens smudges safely and effectively using a Camera Lens Cleaning Kit. From choosing the right tools to mastering a step-by-step cleaning routine, you’ll discover practical, affordable cleaning tips that deliver professional-level results — no matter your budget.
Why Lens Smudges Matter: The Impact on Your Photography
Lens smudges might seem like a minor inconvenience, but their effect on your images can be dramatic. Even a small fingerprint or oil mark on the front element of your lens acts like a filter you never asked for — scattering light in unpredictable ways, softening details that should be tack-sharp, and reducing the contrast that gives photographs their visual punch. In backlit situations, a single smudge can introduce flare and ghosting that overwhelms an otherwise well-exposed frame. For hobbyists who pour creative energy into every composition, this kind of invisible sabotage is especially frustrating because the damage often isn’t apparent until you’re reviewing files at home.
The most common culprits behind lens smudges are everyday and unavoidable. Fingerprints top the list — a quick lens swap or an accidental touch during a bag change leaves behind oils that cling stubbornly to glass. Moisture from humid environments or breathing too close to the front element creates a thin film that attracts dust particles, compounding the problem. Even airborne pollutants and sunscreen residue transferred from your hands can coat a lens surface over time.
Ignoring these contaminants doesn’t just compromise today’s photos. Oils and grime left sitting on coated glass can gradually etch into anti-reflective and hydrophobic coatings, causing permanent degradation that no cleaning will reverse. For hobbyists who view their gear as a long-term investment in their creative journey, understanding that lens smudges are both an image-quality issue and a lens-health issue is the first step toward building better habits. Keeping your glass clean isn’t fussy perfectionism — it’s practical care that protects your results and your equipment simultaneously.
Choosing the Right Camera Lens Cleaning Kit: A Hobbyist’s Guide
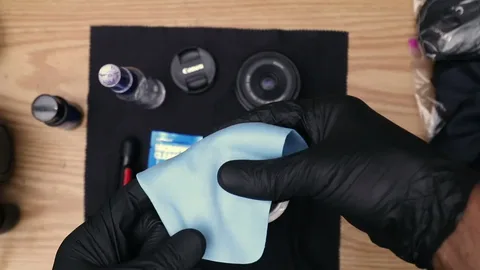
Walking into a camera store or browsing online for a Camera Lens Cleaning Kit can feel overwhelming when dozens of options promise spotless clarity but vary wildly in what they actually include. The truth is, you don’t need the most expensive kit on the shelf — you need one that contains the right tools and uses materials that won’t compromise your lens coatings. A well-rounded kit should include four core components: a microfiber cloth, a lens cleaning solution, an air blower, and a soft-bristled brush. These four items, when used correctly, can handle virtually every type of smudge or contaminant you’ll encounter in the field.
When comparing kits, pay attention to what’s inside rather than how the packaging looks. Some budget options pad their contents with redundant items like multiple low-quality wipes or flimsy carrying cases, while skimping on the tools that actually matter. A good kit for hobbyists strikes a balance — it includes high-quality essentials without unnecessary extras that inflate the cost. Look for kits that use individually wrapped lens wipes or provide a spray bottle with alcohol-free solution, as these tend to be safer for coated optics. Portable kits that fit inside a camera bag pocket are especially practical for photographers who shoot on location and need quick access between shots.
Key Components Explained
A microfiber cloth is the workhorse of any cleaning kit. Its ultra-fine fibers lift oils and residue without scratching, making it ideal for wiping away fingerprints and light smudges. Always use a clean cloth — a dirty one simply redistributes grime and risks dragging abrasive particles across the glass. Lens cleaning solution handles the stubborn marks that a dry cloth can’t budge, such as dried water spots or sunscreen residue. Apply it sparingly to the cloth rather than directly onto the lens to prevent liquid from seeping into the barrel. An air blower is your first line of defense, used before any contact cleaning to blast away loose dust and sand that could otherwise scratch the surface when wiped. Unlike canned air, a manual rubber blower produces a gentle, moisture-free stream that’s safe for delicate optics. Finally, a soft-bristled lens brush — often with retractable camel-hair bristles — sweeps away particles lodged around the edges of the front element where a blower alone can’t reach. For hobbyists on a budget, investing in one kit with genuinely quality versions of these four tools will outperform a drawer full of cheap alternatives every time.
Step-by-Step Guide to Removing Lens Smudges with a Cleaning Kit
Knowing what tools you have is one thing — knowing how to use them in the right order is what separates effective cleaning from accidental damage. The biggest mistake hobbyists make is jumping straight to wiping, which grinds loose particles into the coating like sandpaper. A proper cleaning routine follows a specific sequence designed to remove contaminants layer by layer, from the least invasive method to the most direct contact. Master this process once, and it becomes second nature every time you pull your camera from the bag.
Pre-Cleaning Preparation
Before you touch your lens, wash and thoroughly dry your hands. The natural oils on your fingertips are the primary source of smudges, so starting with clean hands prevents you from adding new marks while trying to remove old ones. Choose a workspace that’s as dust-free as possible — avoid windy outdoor spots or rooms where you’ve just vacuumed, as airborne particles settle quickly on exposed glass. If you’re cleaning in the field, find a sheltered area and angle the lens downward so gravity works in your favor, keeping debris from falling onto the element. Lay out your cleaning tools on a clean surface so everything is within reach, and remove the lens cap only when you’re ready to begin.
Actual Cleaning Process
Start with your air blower. Hold the lens at a slight downward angle and give three to four firm squeezes, directing the air stream across the front element from the center outward. This dislodges sand, dust, and loose fibers that would otherwise scratch the glass during wiping. Next, use your soft-bristled brush to gently sweep any stubborn particles clinging to the edges or around the filter threads — work from the center toward the rim in light, single-direction strokes rather than scrubbing back and forth.
Now assess the surface. If only dust was the issue, you may already be done. For visible smudges or oily fingerprints, apply one or two drops of lens cleaning solution to a fresh section of your microfiber cloth — never directly onto the glass, as excess liquid can wick into the lens barrel and damage internal elements. Place the dampened cloth gently at the center of the lens and wipe outward in a slow, circular spiral motion. This pattern pushes contaminants toward the edges rather than redistributing them across the middle of the frame where they affect image quality most. Use light, consistent pressure; pressing hard won’t clean better and risks stressing the element.
Follow immediately with a dry section of the same microfiber cloth, repeating the center-outward spiral to buff away any remaining moisture or streaks. Hold the lens under a light source at various angles to check for residual marks. If a stubborn spot remains, repeat the damp-then-dry process on that specific area rather than re-cleaning the entire surface. One essential cleaning tip to remember: never reuse a soiled section of cloth, as trapped grit particles turn your cleaning tool into an abrasive. Once satisfied, replace the lens cap promptly to protect your freshly cleaned glass from immediate re-contamination.
Pro Cleaning Tips for Maintaining Spotless Clarity
Getting your lens clean is only half the battle — keeping it that way between shoots is where smart habits make the biggest difference. One of the most overlooked cleaning tips is also the simplest: always replace your lens cap the moment you stop shooting. It sounds obvious, but in the rush of packing up after a session, many hobbyists toss an uncapped lens into their bag where it collects dust, fibers, and moisture. A UV or clear protective filter mounted on your front element adds another layer of defense, giving you a sacrificial surface that’s far cheaper to replace than a scratched lens coating.
Storage matters more than most photographers realize. Keep your lenses in padded pouches or compartments with silica gel packets to control humidity, especially if you live in a tropical or coastal climate. Moisture that sits on glass overnight can leave mineral deposits that bond to coatings and become increasingly difficult to remove. When you do store gear for extended periods, stand lenses upright with the rear cap facing down so dust settles away from the front element.
Equally important is knowing what to avoid. Household glass cleaners, paper towels, and compressed air cans are all common temptations that can wreak havoc on optical surfaces. Glass cleaners often contain ammonia or other solvents that strip anti-reflective coatings, paper towels are surprisingly abrasive at a microscopic level, and canned air can blast propellant residue onto the glass or force particles deeper into the lens barrel. Stick exclusively to tools designed for optics. Building a quick maintenance routine — a 30-second blower-and-brush pass before each shoot and a thorough wipe-down after every outing — keeps smudges from accumulating and ensures your lens delivers spotless clarity shot after shot without marathon cleaning sessions.
Top Affordable Camera Lens Cleaning Kits Recommended for Hobbyists
Finding a Camera Lens Cleaning Kit that balances quality and affordability doesn’t require hours of research — a handful of well-established options consistently earn praise from photography hobbyists. The VSGO portable cleaning kit is a popular choice for on-the-go shooters, packing a compact air blower, microfiber cloths, and a lens pen into a slim case that slides easily into a camera bag pocket. Its strength lies in portability, though the included blower is smaller than standalone options and may lack power for heavier debris.
The Altura Photo Professional Cleaning Kit offers one of the most complete packages at a budget-friendly price point, including a double-sided lens pen, a large rubber air blower, individually wrapped wet wipes, and a microfiber cloth. It covers every stage of the cleaning process without requiring separate purchases, making it ideal for hobbyists building their first toolkit. The trade-off is that the carrying pouch feels basic, but the tools themselves punch well above their cost. For those who prefer a minimalist approach, the Zeiss Lens Cleaning Kit focuses on premium pre-moistened wipes and a high-quality microfiber spray cloth — perfect for photographers who want a quick, reliable wipe-down without carrying multiple tools. The wipes are individually sealed, ensuring each one is fresh and free from contaminants. Brands like Ulanzi, Nikon, and Canon also offer their own accessory-focused kits that include optical-grade solutions tested specifically for coated lenses, giving peace of mind to hobbyists concerned about coating compatibility. Whichever kit you choose, prioritize one that includes genuinely effective core tools over one that simply offers the longest feature list — your lens will thank you with spotless clarity every time you shoot.
Keep Your Lens Spotless for Sharper, Lasting Results
A single smudge on your lens can quietly undermine hours of creative effort, but the solution doesn’t have to be complicated or costly. Throughout this guide, we’ve seen how lens smudges degrade image sharpness, reduce contrast, and even cause long-term coating damage when left unaddressed. Choosing the right Camera Lens Cleaning Kit — one built around quality essentials like a microfiber cloth, optical-safe solution, air blower, and soft brush — gives you everything you need to tackle contaminants safely. Following a disciplined step-by-step process, from hands-free dust removal to gentle circular wiping, ensures you clean effectively without risking scratches or coating wear. And by adopting simple pro habits like capping your lens immediately, using protective filters, and running a quick blower pass before every shoot, you maintain spotless clarity without turning cleaning into a chore.
Your lenses are the eyes of your creative vision, and they deserve consistent care. Invest in a reliable cleaning kit, practice the techniques outlined here, and make maintenance part of your regular shooting routine. With proper attention, your glass will reward you with sharper, more vibrant images for years to come — and you’ll never lose another golden-hour shot to an invisible fingerprint again.