You’ve spent an hour setting up the perfect composition—your subject is positioned beautifully, the background is uncluttered, and you press the shutter. But when you review the image, harsh shadows cut across your subject’s face, details vanish into blown-out highlights, and the entire mood you envisioned is lost. The culprit isn’t your camera or lens; it’s the lighting. Light is the single most defining element in photography and videography, shaping everything from texture and depth to emotion and storytelling. Yet natural light is unpredictable, and fixed artificial sources rarely deliver the precision creative work demands. This is where adjustable lighting transforms your results, giving you command over intensity, color, and direction so every frame matches your vision. In this article, we’ll explore the fundamentals of adjustable lighting, break down essential equipment features and modifiers like softboxes, walk through a practical selection guide, and cover setup strategies including power considerations—everything enthusiasts need to consistently achieve professional-quality shots.
The Fundamentals of Adjustable Lighting for Photography
Adjustable lighting refers to any illumination source that allows photographers and videographers to modify its output characteristics in real time. At its core, this means controlling three critical variables: intensity, color temperature, and direction. Intensity determines how much light reaches your subject, directly affecting exposure and the visibility of fine details. Color temperature—measured in Kelvin—dictates whether your scene appears warm and inviting or cool and clinical, fundamentally altering the emotional tone of an image. Direction shapes how shadows fall across surfaces, creating depth, dimension, and drama that flat, head-on light simply cannot achieve.
When you command all three variables simultaneously, you gain the ability to sculpt light the way a painter applies brushstrokes. A portrait can shift from harsh and editorial to soft and intimate with a simple adjustment. Product photography benefits from precise highlight placement that reveals texture without glare. In videography, maintaining consistent lighting across takes becomes manageable rather than a matter of luck. Fixed lighting sources—whether a bare bulb overhead or a single-output flash—force you to adapt your creative vision to whatever the light happens to deliver. Adjustable lighting reverses that relationship, making the light serve your intent rather than the other way around. This fundamental shift is what separates snapshots from professional-quality imagery.
Essential Lighting Equipment Features and Their Impact
Not all adjustable lights are created equal, and the features built into your lighting equipment determine how much creative control you actually have on set. The most foundational feature is a dimmable output, which lets you scale brightness smoothly—typically from around 0% to 100%—without swapping bulbs or stacking neutral density gels. This alone solves the common problem of overexposed highlights or underlit backgrounds that plague photographers working with on-or-off light sources. Equally important is color temperature control. Bi-color LED panels, for instance, blend warm and cool diodes so you can dial in anywhere from roughly 2700K candlelight warmth to 6500K daylight coolness, matching ambient conditions or deliberately contrasting them for creative effect. This eliminates the color casts that force tedious white-balance corrections in post-production.
Beam angle adjustment is another feature that dramatically expands what a single light can do. A narrow beam isolates a subject against a dark background, while a wide flood fills an entire scene evenly—switching between the two takes seconds rather than requiring a completely different fixture. Beyond the light head itself, how you power your equipment shapes where and how long you can shoot. AC power options deliver consistent, uninterrupted output for lengthy studio sessions where you need absolute reliability, while battery-powered units free you to work on location—rooftops, forests, client offices—without hunting for outlets. Many modern lighting equipment features both power modes, letting you transition seamlessly between studio and field work. Together, these capabilities—dimming, bi-color tuning, beam control, and flexible power sources—form a toolkit that addresses virtually every common lighting challenge photographers and videographers encounter.
Understanding Adjustability and Control Mechanisms
How you interact with these features matters just as much as the features themselves. Entry-level lights typically use physical dials or sliders mounted on the fixture’s body, offering tactile, immediate feedback that many photographers prefer for quick adjustments mid-shoot. More advanced panels incorporate LCD screens displaying precise numerical readouts—knowing you’re at exactly 4500K and 60% intensity lets you replicate a setup weeks later or communicate settings to a collaborator across the room. At the top end, app-based control systems connect to your lights via Bluetooth or Wi-Fi, enabling you to adjust multiple fixtures from your phone or tablet without leaving your camera position. This is especially valuable when lights are mounted overhead on booms or tucked into tight spaces behind set pieces. Precise adjustability translates directly into better exposure control: instead of guessing and chimping through test shots, you fine-tune output in small increments until the histogram and the mood align perfectly. It also unlocks creative effects—slowly ramping color temperature during a video take to simulate a passing cloud, or dropping intensity on a hair light by just 10% to keep it subtle. The more granular your control mechanism, the closer your final image matches the picture in your mind’s eye.
Harnessing Light Modifiers: From Softboxes to Advanced Tools
An adjustable light on its own is powerful, but pairing it with the right light modifiers is what truly unlocks cinematic and editorial-quality results. Think of your light source as raw material and modifiers as the tools that shape it into something refined. Without modification, even a perfectly dimmed LED panel can produce light that feels flat or harsh depending on its size relative to your subject. Light modifiers solve this by altering the quality, spread, and direction of the output before it ever reaches your scene. Softboxes are among the most widely used modifiers for good reason—they enclose the light source and pass it through a diffusion panel, transforming a small, hard point of light into a broad, wraparound glow that minimizes harsh shadows and flatters skin tones. The result is the kind of naturally soft illumination you see in magazine portraits and high-end product catalogs. Beyond softboxes, umbrellas offer a quick-setup alternative that bounces or shoots light through translucent fabric for a similarly diffused effect, though with less directional control. Grids and honeycombs snap onto softboxes or reflectors to narrow the beam into a focused channel, preventing spill onto backgrounds or other parts of the set. Reflectors—whether collapsible discs or rigid boards—redirect existing light to fill shadows without adding another powered source, keeping setups simple and energy-efficient.
Types and Applications of Common Modifiers
Choosing the right modifier depends on what you’re shooting and the mood you want to create. For portrait photography, a large rectangular softbox positioned at a 45-degree angle to your subject produces classic Rembrandt lighting with a gentle shadow transition across the face—pair it with a reflector on the opposite side to open up shadow detail without introducing a second light. Product photographers often prefer strip softboxes, which create long, narrow highlights on reflective surfaces like glass or metal, revealing shape and contour without overwhelming glare. When shooting video interviews or talking-head content, an octagonal softbox placed directly in front of and slightly above the subject delivers even, flattering illumination with a natural-looking circular catchlight in the eyes. Grids become essential when you need to isolate your subject from the background—attach one to a softbox aimed at your model while keeping the backdrop deliberately darker for dramatic separation. For run-and-gun videography on location, a compact collapsible reflector paired with a single adjustable LED panel can simulate a two-light setup with minimal gear. The key principle across all these applications is that light modifiers don’t replace adjustable lighting—they extend it. Dimming your source controls how much light enters the modifier, color temperature tuning ensures the modified output matches your scene’s ambient tones, and beam angle adjustment determines how efficiently the modifier is filled with light. When these elements work together, you achieve a level of precision and polish that raw, unmodified light simply cannot deliver.
How to Choose the Right Adjustable Lighting Solutions
With so many adjustable lighting options available, selecting the right equipment can feel overwhelming—especially when you’re balancing creative ambitions against practical constraints. The key is approaching the decision methodically rather than chasing specs or brand names. Your shooting environment, subject matter, and long-term goals should drive every choice, ensuring that the gear you invest in today continues to serve you as your skills evolve.
Start by honestly assessing where and what you shoot most often. A photographer who works primarily in a dedicated home studio has very different needs than someone filming documentary content in unpredictable locations. Studio-based creators can prioritize larger, more powerful fixtures with AC power options, since portability and battery life aren’t concerns. Location shooters, on the other hand, need lightweight, battery-powered units that set up fast and travel easily—compact LED panels from brands like Ulanzi have become popular among on-the-go creators for exactly this reason. If you split time between both environments, look for dual-power systems that plug into a wall outlet for studio reliability but accept rechargeable battery packs for field work. Next, evaluate how each light integrates with modifiers you already own or plan to acquire. A fixture with a Bowens-mount adapter, for example, opens the door to hundreds of compatible softboxes, grids, and beauty dishes from multiple manufacturers, protecting you from being locked into a single ecosystem. Adjustability range matters too—a light that only dims down to 20% may leave you struggling in small spaces or intimate close-ups where subtle illumination is essential.
Step-by-Step Selection Process for Enthusiasts
A practical checklist keeps the selection process focused and efficient. First, define your project requirements in writing: list the genres you shoot, typical subject distances, and whether you need continuous light for video or strobe capability for stills. This document becomes your filter for eliminating options that don’t fit. Second, rank your feature priorities. If color accuracy is paramount—say, for fashion or food photography—prioritize lights with a high CRI (Color Rendering Index) rating of 95 or above, along with broad bi-color temperature ranges. If you frequently shoot long interviews or events, AC power options and cool-running LED technology should top your list to avoid overheating and mid-session battery swaps. Third, test compatibility with your existing gear before committing. Check whether the light’s mounting system works with your tripods, stands, and boom arms, and confirm that any wireless control apps support your phone’s operating system. Fourth, read user reviews from photographers working in your specific niche—a light that excels for YouTube content creators may underperform for macro product work, and vice versa. Finally, think about scalability. Purchasing two identical mid-range panels gives you a matched multi-light setup you can expand later, rather than one premium fixture that sits alone. Budget-conscious enthusiasts often get better results from a well-chosen kit of moderately featured lights paired with quality modifiers than from a single flagship unit used bare. The goal is building a cohesive system where every component—light, modifier, power source, and control interface—works together to give you repeatable, professional-quality results across every shoot.
Practical Setup and Power Considerations for Optimal Performance
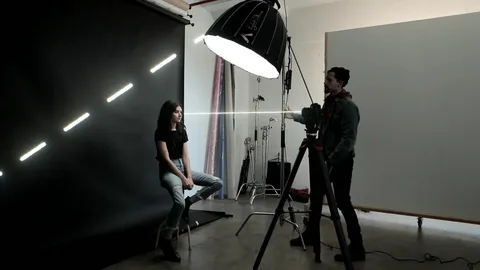
Owning great adjustable lighting equipment is only half the equation—how you set it up and power it determines whether your shots actually reach their potential. Start with positioning: place your key light at roughly a 45-degree angle to your subject and slightly above eye level, which creates natural-looking dimension without unflattering under-chin shadows. Mount a softbox or other modifier before you fine-tune intensity, since the modifier will reduce output by one to two stops and alter the spread pattern. Secure all light stands on stable surfaces, and if you’re working with boom arms or overhead rigs, always use counterweights and sandbags to prevent dangerous tip-overs. Cable management matters more than most photographers realize—tape AC power cords to the floor with gaffer tape to eliminate trip hazards, and route them away from high-traffic areas on set. When integrating multiple lights, power them on one at a time and adjust each independently before evaluating the combined effect, which prevents the common mistake of over-lighting a scene. Keep ambient light in mind as well: close blinds or flag windows when you need full control, or deliberately blend your adjustable sources with natural light for a hybrid look that feels organic.
Maximizing Flexibility with Power Sources
Your choice between AC power options and battery operation should be driven by the specific demands of each shoot rather than a blanket preference. AC power delivers uninterrupted, consistent output that never degrades mid-session, making it the clear choice for studio portraits, product photography, and any scenario where you’re working within arm’s reach of a wall outlet. Long interview shoots and multi-hour video productions particularly benefit, since you never need to pause for a battery swap right when your subject hits their stride. Battery power, conversely, unlocks locations that AC simply can’t reach—outdoor editorial shoots, event coverage in venues with limited outlets, or remote landscape work where extension cords aren’t an option. The trade-off is finite run time and, on some units, a gradual decrease in maximum brightness as the charge depletes. To manage this effectively, carry at least one fully charged spare battery per light and monitor remaining capacity between setups. If your lights support both power modes, a practical strategy is to default to AC whenever an outlet exists and reserve batteries for moments that demand mobility. On mixed sets—a studio with an adjacent outdoor area, for instance—you can keep your main key light on AC for reliability while running a portable fill or hair light on battery. This hybrid approach gives you the stability of wired power where it counts most and the freedom of cordless operation where creativity requires it.
Master Your Light to Master Your Photography
Adjustable lighting isn’t a luxury reserved for high-budget studios—it’s a non-negotiable foundation for any photographer or videographer serious about consistently producing professional-quality work. Throughout this article, we’ve seen how controlling intensity, color temperature, and direction gives you the power to shape every frame with intention rather than leaving results to chance. The right lighting equipment features—dimmable outputs, bi-color tuning, flexible beam angles, and reliable AC power options alongside battery versatility—solve the most common technical frustrations before they ever reach your memory card. Light modifiers like softboxes, grids, and reflectors extend that control further, transforming raw output into sculpted, polished illumination tailored to portraits, products, or video. Choosing the right system comes down to honest self-assessment: know your shooting environments, prioritize features that match your genres, and build a cohesive kit that scales with your ambitions. Finally, thoughtful setup and smart power management ensure that every piece of gear performs at its best when it matters most. Now it’s your turn—take these insights into your next session, experiment with positioning and modifiers, and watch the gap between the image in your mind and the image on your screen disappear.