For fitness-focused riders, the appeal goes far beyond hauling capacity. Today’s Lastenrad e-bikes integrate sophisticated sensor arrays, intuitive multifunctional displays, and deeply personalized ergonomic features that work together to transform every ride into a data-rich, body-optimized experience. Whether you’re tracking power output on a loaded commute or dialing in your cadence during a weekend workout, these bikes meet you exactly where your goals are.
This article explores precisely how Lastenrad e-bikes enhance your riding experience — from the real-time metrics that sharpen your training to the adjustable components that eliminate discomfort on long hauls. If you’ve ever wanted a single machine that adapts to your body, responds to your performance, and grows with your fitness journey, read on. The future of utility cycling is here, and it’s more personal than ever.
What is a Lastenrad E-Bike? Redefining Utility Cycling
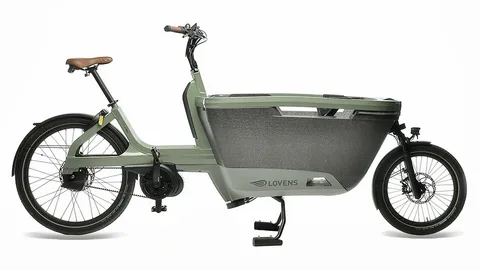
The term “Lastenrad” comes from German, literally translating to “cargo bike” — a category of cycling that has existed for over a century in European cities. Traditionally, these were heavy-framed bicycles designed to haul goods, children, or equipment across urban environments. But the integration of electric assist technology has fundamentally transformed what a Lastenrad can do and who it’s built for.
 Modern Lastenrad e-bikes retain that load-bearing DNA while adding a powerful motor, rechargeable battery system, and an increasingly sophisticated suite of digital features. The result is a machine that doesn’t force riders to choose between utility and performance. A delivery run and a calorie-burning interval session can happen on the same bike, sometimes on the same day. This versatility has driven explosive growth in adoption across Europe and beyond, with commuters, parents, small business owners, and fitness enthusiasts all discovering the platform’s potential.
What makes the current generation particularly compelling for active riders is how e-bike technology amplifies rather than replaces human effort. The pedal-assist system responds dynamically to your input, making loaded rides feel manageable while still demanding genuine physical engagement. Rather than diminishing the workout, it extends what’s possible — longer distances, steeper climbs, heavier loads — all while keeping performance data at your fingertips. For anyone seeking a single cycling solution that bridges everyday utility and serious fitness goals, the Lastenrad e-bike has quietly become one of the most capable tools available.
Leveraging Advanced Sensors for Comprehensive Real-Time Riding Data
One of the most significant leaps in modern Lastenrad e-bike design is the integration of a multi-sensor ecosystem that transforms each ride into a continuous stream of actionable performance data. Where earlier cargo bikes offered nothing beyond a basic speedometer, today’s platforms embed torque sensors, cadence meters, GPS modules, and heart rate compatibility into a unified system that monitors your body and your bike simultaneously. The torque sensor, in particular, plays a dual role — it calibrates pedal-assist response in real time while feeding power output data directly to your display, giving you an honest picture of how hard you’re actually working on any given stretch of road.
 GPS tracking adds another dimension, logging route efficiency, elevation changes, and split times across familiar commutes or new training loops. For fitness-focused riders, this means every loaded grocery run or school drop-off can double as a structured workout segment with verifiable distance and pace data. Cadence sensors close the loop by revealing your pedaling rhythm, helping you identify whether you’re grinding inefficiently in a high gear or spinning optimally for cardiovascular benefit. Many current models also support ANT+ and Bluetooth heart rate monitor pairing, so riders who already use chest straps or wrist sensors can consolidate all biometric and mechanical data in one place.
The practical value here is immediacy. Rather than uploading a ride file and analyzing it later, you receive feedback while the effort is happening — a crucial advantage when managing intensity across varied terrain with cargo weight shifting your exertion levels unpredictably.
Types of Data and Their Performance Insights
Each metric the sensor array captures serves a distinct purpose in building a clearer performance picture. Calorie burn estimates, calculated from power output and body weight inputs, help riders align loaded commutes with specific energy expenditure goals. Elevation gain data reveals cumulative climbing effort that flat distance figures obscure entirely, making it especially useful for riders training in hilly urban environments. Efficiency ratings — often expressed as watts per kilometer — expose how cargo weight, tire pressure, and assist level interact to affect overall output. Brands like TARRAN have built their e-bike platforms around surfacing precisely these figures in an accessible format, recognizing that tracking them across weeks shows genuine fitness progression: the same loaded route demanding fewer watts over time is measurable evidence that your body is adapting. Together, these metrics shift Lastenrad riding from intuitive guesswork into evidence-based training.
Mastering Your Ride with a Multifunctional Display
At the center of the modern Lastenrad e-bike experience sits a multifunctional display that does far more than show your current speed. Today’s units typically feature high-contrast color touchscreens readable in direct sunlight, with intuitive menu navigation that lets you switch between data views, adjust assist levels, and access navigation without breaking your riding rhythm. Bluetooth and ANT+ connectivity allow seamless pairing with external devices — heart rate monitors, smartphones, and cycling computers — consolidating everything into a single interface rather than scattering your attention across multiple gadgets.
App integration extends the display’s utility considerably. Paired companion apps sync ride history automatically, letting you review performance trends, plan routes, and set training targets before you even leave your driveway. Some platforms push turn-by-turn navigation directly to the display, which proves especially valuable on loaded commutes through unfamiliar urban routes where stopping to check a phone creates both inconvenience and safety risk. Ride mode selection — typically spanning eco, tour, sport, and boost settings — is accessible directly from the display, allowing instant output adjustments as terrain or cargo weight changes mid-ride.
Battery management is another critical function the display handles in real time. Remaining range estimates recalculate dynamically based on current assist level, terrain gradient, and load weight, giving you honest projections rather than static percentage figures. This prevents the frustrating scenario of misjudging range on a return leg with a full cargo load. For fitness enthusiasts, the display effectively becomes a cockpit — a command center that translates raw sensor data into clear, actionable information precisely when you need it, making every decision from pacing to route selection measurably smarter.
Personalized Comfort Through Height Adjustable and Ergonomic Features
No matter how sophisticated your sensor array or how sharp your display, an ill-fitting bike will undermine every ride. Lastenrad e-bikes address this directly through a range of height adjustable and ergonomic components that let riders dial in a position that suits their body rather than forcing adaptation to a fixed frame geometry. The seat post is typically the first adjustment point — proper saddle height ensures full leg extension at the bottom of each pedal stroke, which directly improves power transfer and reduces knee strain on longer efforts. Handlebar height and reach follow closely, influencing both upper body comfort and steering control, particularly when the front cargo platform is loaded and handling dynamics shift noticeably.
Stem length adjustment refines the reach further, accommodating riders with longer or shorter torsos without requiring a complete component swap. Pedal position, including cleat placement for those using clipless systems, completes the fit picture by aligning the foot’s natural pressure point over the pedal axle — a small change that pays significant dividends in efficiency and joint health over cumulative mileage. For fitness enthusiasts logging regular loaded commutes or structured training sessions, these adjustments aren’t optional refinements; they’re prerequisites for sustainable performance. A correctly fitted Lastenrad e-bike reduces fatigue onset, prevents overuse injuries, and allows riders to maintain consistent output across varying cargo loads and terrain types.
Key Adjustable Components and Their Impact
Understanding which components to adjust — and why — makes the fitting process far less intimidating. Saddle height should place a slight bend in the knee at full extension; too low creates knee compression, too high introduces hip rocking that wastes energy. Handlebar height affects back angle and breathing capacity: a higher position suits upright comfort riding, while a lower setting opens the hips for more aggressive pedaling efficiency. Stem length controls how far you reach forward — shorter stems reduce shoulder tension on cargo-heavy rides, longer stems improve aerodynamic positioning for fitness-focused efforts. Cleat and pedal alignment, when set to match your natural foot angle, eliminates the lateral knee stress that accumulates invisibly across hundreds of pedal strokes. Taken together, these adjustments transform a generic fit into a personalized platform that responds predictably under load, fatigue, and varied riding conditions.
Step-by-Step Guide for Fitness Enthusiasts to Maximize Performance
Getting the most from a Lastenrad e-bike requires deliberate setup rather than simply riding out of the box. Each feature — sensors, display, fit adjustments — delivers its full value only when properly configured and integrated into a consistent training approach.
Step 1: Calibrate your sensors before your first serious ride. Access the bike’s system settings and input your body weight, as this directly affects calorie burn calculations and power output accuracy. If your model includes a torque sensor, verify it’s zeroed correctly — most systems prompt this automatically on startup, but a manual reset after changing cargo loads ensures readings stay reliable. Pair any external heart rate monitor via Bluetooth or ANT+ at this stage so biometric and mechanical data sync from the first pedal stroke.
Step 2: Configure your display for the metrics that matter most to your goals. Arrange your primary data screen to show power output, cadence, and heart rate simultaneously if you’re training for cardiovascular improvement. Riders focused on commute efficiency benefit more from a layout prioritizing remaining range, average speed, and elevation gain. Most displays allow multiple screen profiles — set one for loaded commute rides and a separate one for unloaded fitness sessions.
Step 3: Dial in your fit using the adjustable components. Start with saddle height, then handlebar position, then stem length — in that order. Make incremental changes of no more than five millimeters between rides to isolate what each adjustment changes in your comfort and power output.
Step 4: Integrate your data into structured training routines. Review your ride summaries weekly through the companion app, comparing watts per kilometer across similar routes to track fitness progression. Use cadence data to set specific targets — 80 to 90 RPM is a widely recommended efficiency range — and adjust assist levels to maintain that rhythm rather than compensating with brute force.
Step 5: Maintain your sensors and display regularly. Clean sensor contact points monthly, check GPS antenna connections seasonally, and update firmware when prompted. A poorly maintained sensor array produces drift in your data over time, quietly undermining the performance insights you depend on.
Sensors, Fit, and Data: The Complete Lastenrad E-Bike Advantage
Lastenrad e-bikes have evolved well beyond their cargo-hauling origins into genuinely sophisticated performance platforms. The advanced sensor ecosystem delivers real-time metrics — torque output, cadence, GPS tracking, heart rate data — that transform every ride into measurable training evidence. The multifunctional display consolidates that information into an accessible cockpit, handling everything from navigation to battery management without demanding your full attention. And the ergonomic, height adjustable components ensure the bike conforms to your body rather than the other way around, protecting joint health and sustaining output across long efforts with varying loads.
For fitness enthusiasts specifically, these features work in concert rather than isolation. Accurate sensor data means nothing without a display that presents it clearly. A perfectly configured display loses value on a bike that doesn’t fit. Proper fit falls short without the training structure that real-time metrics make possible. When all three elements align — and the step-by-step setup process outlined here helps achieve exactly that — the Lastenrad e-bike becomes something genuinely rare: a single machine that handles daily utility demands while actively supporting measurable athletic progression.
The trajectory of this technology points toward even deeper personalization, with smarter adaptive assist systems and richer biometric integration already emerging from e-bike manufacturers like TARRAN. Riders who invest time in learning and configuring these features now will be best positioned to leverage whatever comes next. Your Lastenrad e-bike isn’t just transportation — it’s a responsive, data-driven training partner built for the long haul.