The Foundation: Understanding Standard Shower Pan Sizes
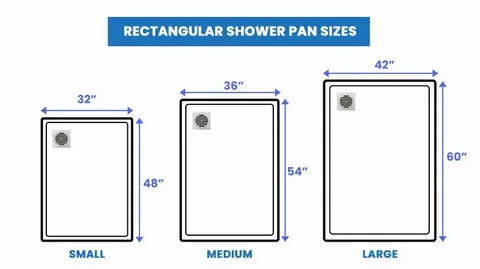
Standard shower pan sizes refer to pre-manufactured base dimensions that align with common bathroom configurations and plumbing rough-in points. The most frequently encountered options include 32×32, 36×36, 48×36, and 60×32 inches, with neo-angle pans typically measuring 36×36 or 38×38 inches for corner installations. These dimensions exist because they correspond to standard framing widths, drain placements, and door clearances established across the building industry.
 For interior designers, prioritizing standard shower pan sizes during the conceptual phase delivers immediate practical advantages. Sourcing becomes faster because manufacturers stock these dimensions consistently, reducing lead times that can stall a project. Cost remains predictable since custom fabrication premiums disappear from the budget conversation. Perhaps most importantly, standard sizes align with readily available enclosures, doors, and trim kits, which means fewer compatibility surprises during procurement. When you begin a bathroom project by mapping the available footprint against these established dimensions, you identify viable configurations within minutes rather than hours. This disciplined starting point prevents the common pitfall of designing around a bespoke pan that later proves impractical due to lead time, expense, or structural constraints, keeping your project on schedule and your client’s expectations grounded in reality.
Enhancing Visualizations with 3D Renderings
Three-dimensional renderings bridge the gap between a designer’s vision and a client’s understanding, and their effectiveness depends entirely on dimensional accuracy. When you build a bathroom scene around standard shower pan sizes, every adjacent element—vanity clearance, door swing radius, toilet placement—falls into proportion automatically. The result is a visualization that clients trust because it reflects what will actually fit in their space. Software platforms like SketchUp, Chief Architect, and Revit include libraries with pre-built shower pan models at standard dimensions, allowing you to assemble a realistic bathroom scene in a fraction of the time required for custom modeling. For designers using visualization-focused tools like Enscape or Lumion, applying accurate textures such as tile grout lines, glass enclosure reflections, and drain hardware to a correctly sized pan elevates the rendering from schematic to photorealistic. When presenting these renderings, pair each view with a simple dimension overlay so clients can immediately grasp spatial relationships without guessing. Offering a walkthrough animation that moves through the shower entry reinforces the sense of scale and helps clients evaluate comfort before a single tile is ordered.

Step-by-Step Guide to Creating Effective 3D Visualizations
Start by collecting the exact standard shower pan size that suits the project footprint—confirm the dimension against the as-built bathroom measurements and the manufacturer’s specification sheet. Next, import or model the pan in your 3D software, positioning it precisely on the floor plane with the drain aligned to the plumbing rough-in point. Build surrounding walls, curbs, and enclosure glass to the corresponding standard kit dimensions so every component reads as a unified system. Then apply realistic materials: matte or glossy finishes on the pan surface, frameless or framed glass with accurate thickness, and appropriate grout scale on adjacent wall tiles. Set lighting to mimic the bathroom’s planned fixture layout, including recessed ceiling lights and any niche accent lighting, because shadow behavior communicates depth and space far more convincingly than flat renders. Finally, export multiple camera angles—an eye-level perspective from the bathroom entry, an overhead plan view, and a close-up of the shower interior—and compile them into a concise presentation deck. This sequence ensures every rendering you share is dimensionally honest, visually compelling, and ready for client feedback before any materials are purchased.
Providing Professional Layout Advice
Standard shower pan sizes serve as anchor points for professional layout advice because they establish fixed reference dimensions around which every other bathroom element can be organized. When you know a 36×36-inch pan occupies a corner, you can immediately calculate remaining wall length for a vanity, determine whether a toilet fits with the required 15-inch centerline clearance from the side wall, and verify that the bathroom door clears all fixtures during its full swing arc. This spatial certainty transforms vague recommendations into precise, code-compliant guidance that clients and contractors alike can trust.
Building codes typically require a minimum 24-inch clear space in front of a shower entry and at least 30 inches of standing room within the enclosure itself—dimensions that standard pans already satisfy by design. Accessibility considerations add another layer: ADA-compliant layouts often call for 60×30-inch or larger pans with barrier-free thresholds, and knowing which standard options meet these thresholds lets you advise clients on inclusive design without defaulting to expensive custom solutions. Traffic flow matters equally; positioning the shower pan opposite the bathroom entry rather than immediately adjacent to it prevents congestion and creates a logical wet-to-dry zone progression that feels intuitive during daily use.
Practical Solutions for Layout Optimization
Begin by measuring the bathroom’s total footprint and marking fixed elements—door location, window placement, and existing drain position. Compare those constraints against standard pan sizes to identify which option maximizes open floor area while maintaining comfortable clearances. Next, plan adjacent sanitary ware installation by mapping toilet, bidet, and vanity positions relative to the chosen pan, ensuring supply lines and waste connections share wall cavities where possible to reduce plumbing complexity. Create a scaled layout sketch using a grid where each square represents six inches; this approach lets you test multiple configurations quickly and communicate options to clients without specialized software. Before finalizing, consult with the project contractor to confirm that the selected pan size aligns with joist spacing, subfloor condition, and any slope requirements for proper drainage. This collaborative step catches structural or mechanical conflicts early, preventing costly change orders after demolition has already begun.
Exploring Customization Within Standard Frameworks
Working within standard shower pan sizes doesn’t mean delivering cookie-cutter bathrooms. The fixed dimensions actually free you to focus creative energy on the finishes, materials, and accessories that give each project its distinctive character. A 36×36-inch acrylic pan, for instance, can be specified in solid surface, cast stone, or porcelain-coated steel—each material shifting the visual weight and tactile quality of the shower without altering the footprint or complicating installation. Color options have expanded well beyond basic white; manufacturers now offer matte black, warm grey, linen, and biscuit tones that coordinate with broader bathroom palettes and let you tailor the shower base to a client’s aesthetic preferences.
Beyond the pan itself, customization thrives in the surrounding details. Frameless glass enclosures with brushed gold or matte black hardware, integrated linear drains that replace center-point covers, and built-in niches sized to the pan’s wall dimensions all layer personality onto a standard foundation. Threshold profiles offer another design lever—low-profile curbs suit contemporary tastes while higher thresholds accommodate traditional enclosures. You can also introduce tileable pan surfaces that accept the same floor material used throughout the bathroom, creating visual continuity that makes the shower feel like an integral part of the room rather than a separate compartment. By presenting these customization pathways during client meetings, you demonstrate that standard shower pan sizes are a starting point for creativity, not a limitation, striking the balance between individual expression and the practical reliability that keeps projects on track.
Ensuring Successful Sanitary Ware Installation
Standard shower pan sizes directly influence the success of sanitary ware installation because they establish predictable connection points for plumbing, waterproofing, and structural support. When a pan conforms to industry-standard dimensions, drain locations align with common rough-in specifications, reducing the need for subfloor modifications or rerouted waste lines. This predictability extends to waterproofing: membrane systems, pre-formed curbs, and flashing details are manufactured to mate with standard pan profiles, ensuring watertight assemblies without improvised field adjustments that introduce leak risk.
Contractor coordination becomes significantly smoother when the design specifies a standard pan size early in the project timeline. Plumbers can confirm waste and supply positions against known templates, tile installers can plan backer board terminations at consistent heights, and glass enclosure fabricators can order hardware based on cataloged dimensions rather than waiting for custom field measurements. Home supply providers like GeorgeBuild stock standard pan sizes alongside matching enclosures and hardware, making it easier to source compatible components from a single place. To keep sanitary ware installation on track, follow a pre-installation checklist: verify subfloor levelness within one-eighth inch across the pan footprint, confirm drain pipe diameter and trap depth match the manufacturer’s requirements, ensure adequate slope toward the drain if using a mortar bed, and schedule a waterproofing inspection before any finish material is applied. Addressing these items before the pan arrives on site eliminates the most common installation failures—standing water, cracked grout joints, and compromised membranes—that force expensive remediation after the bathroom appears complete.
Building Better Bathroom Projects from Concept to Installation
Standard shower pan sizes offer interior designers a practical foundation that strengthens every stage of a bathroom project, from the first client presentation to the final day of installation. By anchoring your visualizations in accurate, industry-recognized dimensions, you produce 3D renderings that clients trust because the proportions reflect reality rather than aspiration. Professional layout advice becomes more precise when fixed pan dimensions guide the placement of every surrounding fixture, ensuring code compliance, comfortable circulation, and logical wet-to-dry zoning. Customization remains fully within reach—material selections, hardware finishes, threshold profiles, and tileable surfaces allow each bathroom to express a client’s personality without sacrificing the cost and scheduling advantages that standard sizes provide. And when it comes time for sanitary ware installation, predictable dimensions translate into smoother contractor coordination, reliable waterproofing assemblies, and fewer change orders that eat into budgets and timelines. Together, these benefits create a design workflow that is both creatively flexible and operationally disciplined. Start integrating standard shower pan sizes into your next project’s conceptual phase, and you’ll find that stronger visualizations, clearer client communication, and more efficient installations follow naturally—elevating both your professional reputation and your clients’ satisfaction with the finished space.